This is everything that I do on the motorcycle between rounds. Save, mounting new bodywork, or changing the clutch (one-off things). I hope to use this as an opportunity for more people to share how they do things on their motorcycle because I have been very fortunate to spend time around some incredible mechanics and this is what I have learned by being around them. If you do things a better way, share it! There is so much knowledge out there but people keep it all locked away in their heads because no one asks them about it. I am by no means an expert. This is just what I have learned by being around amazing people and what I have put into my regular rotation. Please be smart! If something is wrong, it is because I have messed it up, not from the amazing people who help me. All of the products that I mention here, are mentioned only because they work. If I get support from a company it is because we were told it is an amazing product and then the company helped facilitate that. I have a list on my website of all the amazing people who make amazing products!
Bodywork
The first thing I do when I get the bike from the racetrack is to take all the bodywork off. Start with the upper fairing, then the side panels. Next move onto the belly pan. After that the tail section, fuel tank shroud, and fuel tank.
Once I have all of that pulled off, I go through and use Tub o’ Towels on all of the bodywork and then some kind of spray polish on the windscreen. Going through and cleaning the bike thoroughly helps to 1. Make your sponsor stickers on the bike look pristine and maintain your good image, rather than having pockmarks on the people who help you. That may make other companies not as willing to help. 2. It also allows you to inspect your bodywork to see if there is any damage or holes which might affect how well it holds together and could cause further damage down the line.
The bodywork that we use on our bike is from Superbike Unlimited and made by Lacomoto. We used to use other stuff; however, we have found the Lacomoto fitting process much easier straight out of the box. With some other bodywork, it takes a day just to make sure all the holes line up and to make sure the bodywork isn’t rubbing on the frame or dragging on the dash. With Lacomoto it comes pre-drilled and with all the fasteners that you need. It also is a lot lighter and comes apart in pieces. However, we do use the Armour Bodies tail section because it is easier for me to get in a full tuck because I can sit on the tail section itself on the straightaways.
Frame
Next after all the bodywork is clean, I go through and use Tub o’ Towels over the entire frame, all the engine that I can reach, and any other chassis parts. I have found that Tub o’ Towels helps to cut through grease just as well if not better than any other product and we found it doesn’t oxidize as Simple Green can. It also can be used to clean your hands after the fact! Going through the chassis and cleaning that helps to allow you to see if anything is wrong with the bike and you can find issues before they become a hazardous condition. For instance, we just got our R6 back from the west coast, so I can go through the motorcycle for the first time, personally, in 3 months. I found that our brake pressure sensor is improperly routed and may be causing some binding. In addition to that, I found that our clutch lever is tight and didn’t have the correct amount of free play in it to allow for proper disengagement. Due to that, we completely smoked our clutch in race two at Pitt Race 2019. It is always better to go through now, rather than waiting for the issue to rear its ugly head and cause mechanical failures and DNFs. I will also remove the Evol Technology available through Superbike Unlimited footpegs and shifter and clean them with a degreaser. They take 6mm Allens. When torquing them back, they take 23nm. I will leave the shifter unassembled so I can change the oil filter later.
Airbox
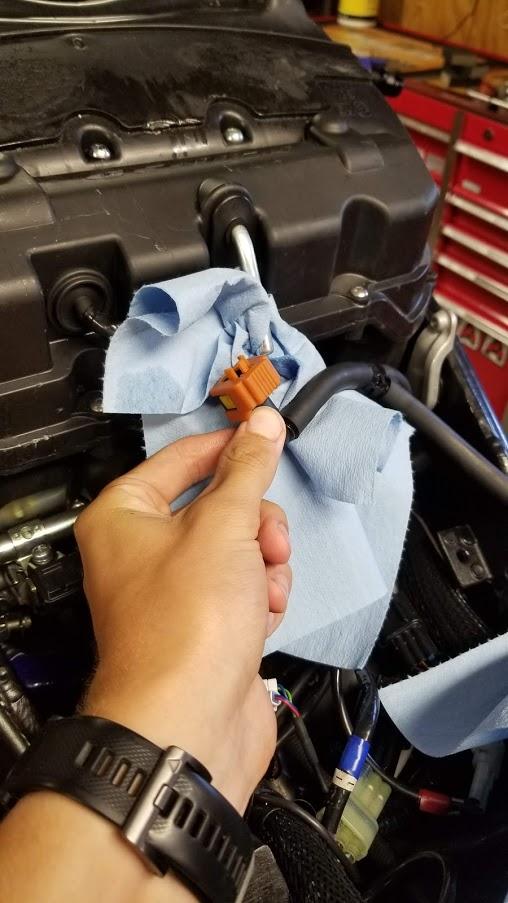
After going through a surface level cleaning, I take off the upper airbox by loosening the bolts, removing the fuel line and disconnecting the plug to the wiring harness. Once that is done I will inspect the condition of the air filter and blow it out with air (NOTE: make sure to blow from the opposite way air flows into the motorcycle which if don’t incorrectly will cause dirt to get forced into the air filter and the engine rather than out and away!). We use an MWR Racing filter which was recommended to use by another team and making sure it is properly cleaned and oiled is essential to not allow dirt into your engine. Especially if you ride on dirty tracks such as Jennings in Florida, or Sonoma in California. Once I have inspected the air filter, I will vacuum out the airbox to make sure there is no dirt or tire rubber sitting in there. I will put the top of the airbox and the air filter on top of one another on a clean half baking sheet. This allows you to organize your parts by function and not to get dirt on everything.
Taking off the lower injectors on a Yamaha Y6 involves a 4mm Allen wrench and you will loosen 6 bolts. 4 on the rearward side of the motorcycle and 2 towards the front wheel. Once you loosen them, THEY WILL NOT COME OUT. They are designed to be captive and stay there. With that done you will need to disconnect the plug from the wiring harness and undo the rubber breather tube. I will also put that on the same half baking tray as the other airbox pieces.
Throttle Bodies
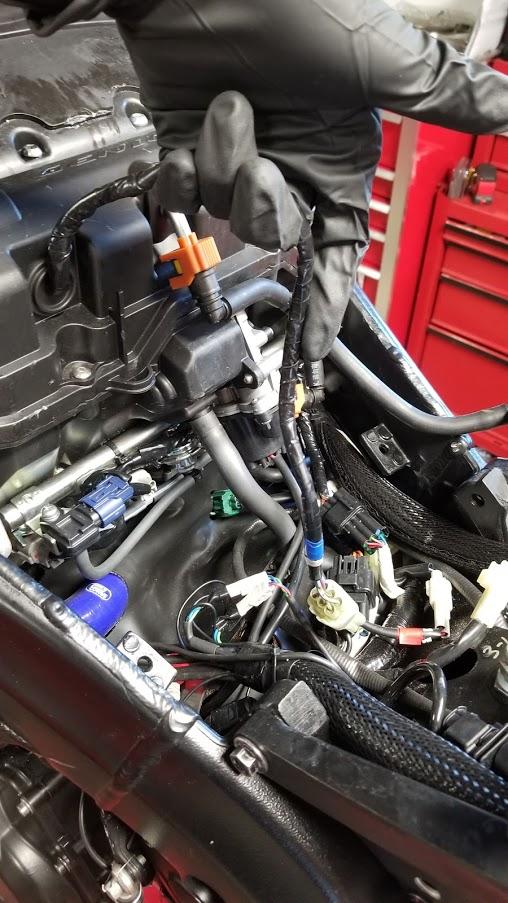
With the airbox out of the way, make sure as you are disconnecting everything to keep an idea of how it all came off, so you know how to put it back on without any external help. To remove the throttle bodies, you need a 4mm Allen on a socket extension that is about 14 inches long to be able to go from one side of the frame to the other and loosen the booties attaching the throttle bodies to the intake ports. Once you loosen them up, NOT REMOVE the bolts. You can pull on the rearward side of the throttle bodies to *pop* it out of the booties. Once that is done, if you have a kit wiring harness you may not need to do anything but if you have a stock wiring harness it might not come with the marking for which is the TPS connector and which is the APS connector so label them A and T accordingly. The APS connector is on the left-hand side and the TPS connector is on the right-hand side. (A word to use is After-Thought with APS being on the left and TPS being on the right) When reassembling everything, if you mix those two up the bike’s throttle will go wide open because the ECU is confused, and you can easily float the valves and have much more damage than you would expect. Only because you confused the APS and TPS connectors. There will also be a connector on the front of the throttle bodies that lays perpendicular to the APS and TPS connectors, make sure to disconnect that as well. What I did to make sure I plug them incorrectly, I took a different paint pen for each and drew a colored line from the connectors onto the throttle body connectors to make sure they go on correctly. After that, you will want to disconnect the throttle cables from their housing. First make sure you label which cable is on top, and which is on the bottom. It is not a necessary step, but it can save you a bunch of headaches later down the road. Loosen the nuts up with a 10mm wrench and then slip the cable from the housing on top and use your finger to pull the rotating piece back to disconnect the bottom throttle cable. Putting your finger on the bump helps a lot with getting a grip on the piece. Once you are done with that make sure to plug your injection ports with something, such as paper towels, exhaust plugs, or gaffers’ tape. Use a vacuum in the basin left on top of the engine from the fuel tank and airbox and injectors to get rid of tire rubber and clean the grease off the connections and heat shield. Using an electrical contact cleaner on the plugs is a good idea to do when you get the chance. Once I have the throttle bodies off, I will put them on a smaller baking sheet by themselves just due to the gasoline that might leak out of them. With the throttle bodies removed, I will check all of the wirings for our AIM Evo 4 S system and TransLogic Autoblipper available through Superbike Unlimited. I have the data system running up the right side of the frame with the TransLogic system running of the left-hand side of the frame. We had an issue with one of the cables coming loose and sliding into the throttle body and keeping the throttle partially open despite closing the throttle in my hand.

Rear Wheel and Swingarm
I will remove the rear wheel to clean the swing arm and prep the bike to remove the shock. First, remove the safety wire (if applied) and then get out a 32mm socket and remove the wheel. We use the stock rear axle and a ProBolt rear nut. To help make wheel changes so much easier, we use Fast Frank Gp Lifters, Captive Rear Brake bracket, Chain Holder Tab, and Captive wheel spacers. Captive Wheel Spacers are a must on pretty much any bike I own! Once I pull the nut off and axle out, the wheel will rest on the GP lifters a couple of millimeters down so you can push the wheel forward and then remove the chain super easy. Once the wheel is out, I will use Tub o’ Towels on the surface of the wheel to remove bits of grease and rubber. Once that is done, I will use a Chain cleaner and clean the rear sprocket of any grease. I will also decrease the axle and use some metal polish on the axle to make sure it looks good when we get to the track. When I pull the chain off it will rest on the chain holder tab. With the rear wheel removed I will clean the inside of the swing arm with Tub o’ Towels and if needed, Chain Cleaner, for tougher grease. Once that is done, I will grease the rear axle.

Shock
With the rear wheel removed, I will move on to pulling the shock out. To do so, I will put peg stands on the bike and then lower the rear stand. When doing so, make sure to still have a hand on the bike just in case something was to go wrong. Once the bike is lowered onto the stands, we have a captive nut for the rear bolt in the linkage. I use a 17mm socket and extension and loosen the bolt. When removing the bottom linkage bolt, you will have to jiggle the swingarm with the stand to loosen shear stress on the bolt and allow it to come free. Then I go to the bottom shock clevis and use a 17mm socket to remove the bolt. The bottom clevis also has a captive nut on it. Once all the bolts are removed from the bottom of the shock, I will use an 8mm Allen to remove the upper shock clevis bolt. It also has a captive nut from Graves. Having captive nuts on all those pieces helps exponentially because you don’t have to put your hand up against the scalding hot exhaust or keep track of washers and nuts.
Once the shock is removed, I will clean the different components of the shock. As well as in the inside of the swing arm where you can’t reach with the shock in place. I will also grease the pivot points to ensure they are sliding freely. We use an Ohlins TTX rear shock. For information related to cleaning your shock, check your manufacturer’s manual.
After the shock is cleaned, I will reinstall the shock and wheel in the reverse order of the above. Making sure to grease all of the linkage bolts. I torque the Rear Suspension linkage plate and arm nuts to 40 NM, and the Rear Axle to 60nm per the owner’s manual and the Fast Frank manual.


Front Brakes
Next, I will move onto the front of the bike and that starts with the brakes. I will remove one caliper off the forks by removing the two 12mm ProBolt stainless bolts. Put them in a tray and get some sort of basin to allow dirty water to flow into. I will either use a cake tin or an 8x12x4 inch plastic tub. The first thing I do to remove the brake pads is to use a small pair of either needle-nose pliers or a tiny screwdriver to pull the small “R” clips out of the rod the brake pads slide on. With those two removed, then push the rod through the brake caliper and the brake pads should fall out into your hand. There will also be a brass piece on top of the brake pads and interwoven between the rod the pads slide on, keep track of that as it is used on street bikes to keep the pads from rattling. I have heard by different people that you can either use it or not on a race bike. With all that removed, be careful due to brake fluid’s incredible ability to destroy the paint of anything it touches! With the one side removed, I will put my hand inside the caliper and hold the piston down on the one side and extend one piston out to clean. When cleaning brake debris, use soapy water. Due to the material on the brake caliper, the aerosol formula of brake cleaner works well on brake fluid but with the other stuff, it won’t actually do anything. So, I use a spray bottle of soapy water and another spray bottle of water to rinse it off with. I also use a plastic brush in order to not scratch anything. I spray the soapy water onto the piston and then scrub with the brush and rinse with the water. Repeat this process for the four different pistons inside the brakes. Once done with the cleaning, I will allow it to dry and rub it down with a shop towel to get rid of as much moisture as possible. After that, I will “deglaze” the pads by rubbing them on the asphalt in a figure 8 pattern. Once both pads are done, then it’s time for reassembly! For brake pads, I currently prefer the SBS Brakes, Race Sintered available through Cycle Gear. They provide enough initial bite but not too much to still allow for fine-tuning for me. I have also run the SBS Brake DS2 pads, however, they have a bit too much bite for me, so we will mix them and have Yamaha OEM pads on the inside for an even feel. We have the different pads on both calipers, however only on one side of the rotor to allow for equal heating of both rotors and theoretically equal load. When reinstalling the brake pads, start out by fitting both sides of the pads in the caliper to the proper side. Then fit the sliding rod through the one side and through the one pad, then compress the spring to allow for the rod to fit through and then fit the other brake pad in. Once you have that all done reinsert the “R” clips. I will fit the brake caliper on the rotor but not bolt it down, only because I need to complete the cleaning process on the other side, and I don’t want the pads compressing on themselves. Otherwise, always bolt down your brake rotor to the recommended torque setting which the owner’s manual states is 35 nm. Once I am done with the one side, it is onto the other side!


Front-Wheel and Forks
Once I am done cleaning both brake calipers, I will remove the front wheel on the front stand. When removing the front wheel make sure to have both brake calipers taken off. Loosen the two pinch bolts with a 6mm Allen. Then I loosen the axle nut with a 22mm socket. With the axle nut loosened I will leave it on by a thread and use it to push the axle out initially to then grab onto it and pull it out completely. With the front wheel removed, I use Tub ‘o Towels and clean the rim to remove grease, brake dust, and tire rubber. I will degrease the front axle and polish it up, and then grease it once more. I then will loosen my front fork potentiometer with the 3mm Allen that we tapped into the bottom of the fork clevis. With that bolt removed, I remove the front fender with there being two 4mm Allen’s on my bike, one of such with a 10mm nut on the backside. With the front fender removed, I will then remove both fork legs to clean the outer tube. I will loosen the handlebar on both ends and loosen the steering damper on the left fork leg. Then loosen the upper portion of the front potentiometer. After that, I will loosen the 3x 6mm m8 bolts on the fork clamps, and the one on the top fork clamp. With all those loosened, I then slide the forks out (which may require some nudging with a rubber hammer). With the forks removed, I will then clean the outer portions with either Tub o’ Towels or just some soapy water. Making sure to keep an eye out for damage or wear that might need to be serviced.

With the front forks cleaned and if the radiator doesn’t need to be cleaned, I will go ahead and re-insert them through the triple trees and tighten the 6mm head, M8 bolts to 23nm and the Zeta Handlebars available through Cycle Gear to 10nm with an 8mm socket on a quarter-inch torque wrench. Partway through the season, I will go through and grease the steering stem and the castle nut but that is a much more in-depth process that needs to be done properly. With the forks assembled I go and reattach the front potentiometer at the bottom first and then pull it up all the way with no preload on the forks and tighten. Then reattach the front fender, grease the axle, and then the wheel which is torqued to 60 nm and the pinch bolts are torqued to 23 nm.


Radiator
With the front end being done but still unassembled, I will then go ahead and drain the radiator coolant through the 8mm bolt head at the bottom of the water pump on the right-hand side. With the coolant drained, I then go and loosen the hose clamp for the bottom part of the radiator and drain it fully. I will also loosen the hose clamp on the upper left-hand side of the radiator and pull the tube off the radiator. We use Samco hoses available through Cycle Gear, as well as we run an auxiliary radiator to help keep coolant temperatures down. We acquired the auxiliary radiator through a company on eBay. We get our OEM radiators through North East Cycle Supply on eBay. Once the coolant is drained, then I go and loosen the two bolts at the top of the OEM radiator and the one bolt at the bottom center running parallel with the side of the radiator. We also run a SE Composites radiator shroud to help with cooling the bike and I will loosen the four bolts holding it on. Once the radiator is free, I will go ahead and cut the cable ties holding the Cox Motorsports OEM radiator guard, and the custom radiator guard made from McMaster-Carr parts. With them off, I will clean them with a degreaser, and then go and start cleaning the radiator assembly itself. I will seal the radiator top with the 1.8 bar pressure release fitting from a KX 65 we use on the bike rather than the 1.1 bar of the OEM Yamaha cap. With the top sealed, I will then take a balloon and cover the openings on the radiator to not let any water in. Then I will use spray foaming engine degreaser onto the radiator and let it sit for a very short time and then rinse it out with water FROM THE INSIDE OUT it is just like the air filter and you don’t want to be forcing dirt and grit into the foldings. With the fins clean, I then will take it and clean up the outside and polish the lower radiator because it is unpainted and beautiful. With that all done, then again, I will blow the radiator with compressed air starting from the inside out to force anything leftover out. Rather than in. With that dry and clean, I then will clean the front of the engine with a degreaser, and the header pipes with rubbing alcohol. Once that is all done, go ahead and reassemble everything in the reverse order. Torque the drain plug to 10nm. When filling the radiator for racing purposes, make sure to always use distilled water rather than tap or even purified as they still will have higher quantities of minerals that are harmful to your engine.


Oil
With the radiator finished and the front and rear end re-assembled, we move on to changing the oil. First, I will drain the old oil into a drain pan, and while that is occurring, I will go ahead and fill up a new oil filter with fresh oil. We always change the oil and filter with every race weekend. Once that is done draining, I will loosen the hose clamp holding it in place and remove the old oil filter with the oil filter socket. With that removed, I will let the bike sit to let go of any old oil it can. With that done, I will then spread a bit of fresh oil onto the O-ring on the filter to help it seal. Then put the oil drain plug back in and put the new oil filter on the engine as well. With the orifices sealed back up, then cut the old safety wire holding the oil fill port and the dipstick. I then will put in two liters of oil, and then I will continually check the level in the machine by pulling out the dipstick, cleaning it with a cloth, reinserting it (NOT SCREWING IT IN) until the oil level reaches 2-3mm above the max fill line. The reason why I do that is that I have been informed that on some tracks such as if you go into T12 at Road Atlanta, for instance, you can actually starve the motor of oil with the G forces put on the bike. I don’t know personally if that is true, however, that is what we have put in the bike for the past two years and haven’t had any major issues in that department. With the oil topped up in the bike, I will go ahead and tighten up the bolts and safety wire it all. However, I won’t safety wire the oil filter, because, with a hose clamp, you can butt the hose clamp up to the solid engine bracket for the front sprocket cover. With you pushing the hose clamp up all the way you can have just as much, if not more security, due to there being one less piece to structurally fail. If you have done it right, you shouldn’t be able to loosen the oil filter because the hose clamp bolt will be on the right-hand side of the bracket and not allow it to turn counterclockwise.

Finishing Touches
Once everything is reattached to the motorcycle, I will go through and check the torque on all the bolts. I will start out and check the motor mount bolts. It is a 14 mm socket and we torque them to 45 NM. I also will go through and use a quarter drive torque wrench with a 5mm Allen and torque all the engine case bolts to the recommended 10nm. The footpegs are torqued to 23 nm, the handlebars to 10nm, front brake to 35nm, fork clamps to 23nm, suspension linkages to 40nm, and the top steering stem nut to 115nm. I will also make sure that the clutch lever has proper free play in it. I also will get the sprockets set up at home for the next track, so then I don’t have to do it at the track.
Fin.
Congratulations! That is everything that I do on my motorcycle between rounds. I hope it helped you out somehow and got you thinking in a new way. If you have a different way of doing it, feel free to share it in the comments so then we all can learn and build off of one another.
#Indy #NL52